Thursday, December 8, 2011

Bodice redux

I haven't had any time to sew because of school/competitions, but I got to actually take out my dress last night and look at it for the first time in two weeks. I decided though that it is really boring and needs something to add interest to it. So here's the new plan:

Left is back, right is front. The white x's are representative of rhinestones and the transparent green is stretch net.

This means I'm going to have to rip out a lot of seams in the next few days, but I think I will be much happier with the results.

Thursday, November 17, 2011

Bodice= 80% done

So the bodice is about 80% done (that's a random number I pulled out of the air, but approximately correct). The top part has been attached to the bodysuit as have the straps. Yay! I made straps using a thick (1") piece of elastic and a lycra casing and attached them to the bodysuit. It took me remarkably less time than I expected to attach the outer bodice to the bodysuit. I expected to have to rip everything out and do it all again once or twice, but I think (I'm hesitant to say for sure) I got it right on the first try! This must be a miracle. I did spend about 10 minutes just staring at it and flipping it around to make sure I was pinning it together right so that I would get a nice smooth top edge and not sew the wrong sides of the fabric together. Then I realized I had put the pins on the wrong side of the fabric and had to move each one to the other side. Then I realized I still had put the pins along the line that would be sewing (is it sad that I thought line of dance when typing that?) and had to go back and move them all 90ยบ. So after doing all that I used a zig zag stitch to secure the elastic down and attach the outside part to the top of the bodysuit. Here's the result:

I pinned the skirts to the bodysuit to give the full effect, but the bottom of the bodice and the skirts are not finished yet, so the wrinkles and lumps will get flattened out. Also the skirts are a little see-through so I'm going to have to make an underskirt lining that goes to my knees or so so that it doesn't look like I'm naked.

Monday, November 14, 2011

Bodice in progress

The story of this dress seems to be that I start another section and then decide to do it entirely differently than how I had originally planned. The funny thing is it's actually going back to closer to the original design. After thinking a lot about how I was going to make it so that I could actually put the bodice on, I decided to scrap my plan to use the satin chiffon for the bodice. Since the satin chiffon does not stretch like the lycra I would have to put in some kind of closure. Zippers are for losers, so I decided to use the extra lycra I had (I'm so glad I ordered twice as much as I expected to need!) This means I'm going to have 2 extra meters of satin chiffon (in addition to the 2 meters of georgette [Chrisanne's version of chiffon]) to use. So I'm entertaining ideas now for what to do with it. I had originally intended to make the floats out of the georgette, but now that I'm going to have all of this extra satin chiffon I might do some combination of the two. Floats are still a ways off though. So here's another work in progress picture:
The top and bottom edges of the bodice aren't done yet (and it clearly has no straps yet which it will soon) but the middle part is pretty much done, so I thought I'd give y'all an update.

Monday, November 7, 2011

With skirts!


Now it has skirts! Everyone say ooooooh!


The skirts are 3 half circles per layer (there are two layers) that's just been sewn together using my wonderful serger and then hemmed with crinoline (again, using the serger.) If you are planning to do any appreciable amount of sewing I highly recommend getting a serger. They are amazing and save you so much time. In the process of fitting the skirts though I realized I had a problem: I want the skirts to sit just above my hips so that means the opening needs to be smaller than my hips, but I also am not putting a zipper in so the problem is getting the skirts over my hips so they will stay. My solution is to put in a snap closure so that it can be open while I slide the dress on and then discreetly snap shut under the bodice and be hidden out of sight. That's the next step followed by actually attaching the skirts to the bodysuit.

Wednesday, November 2, 2011

Updated dress sketch

I promised an updated dress sketch, so here it is!
Qualities not great, sorry!
My green pen sadly exploded recently so I couldn't make it actually green, but the purple will have to work as a stand in. The solid purple is satin chiffon, the dotted is georgette, and the striped is organza (with crinoline in the bottom). I debating putting boning in the bodice to give it that nice shape, but the stoning also adds some stiffness so I might not. It has skirts now but my cell phone camera was being fussy and deleted the pictures before I got to transfer them.


Monday, October 24, 2011

I got carried away on pinterest today

I got a little carried away looking at dresses on pinterest.com today. If you don't know, pinterest is a website that lets you link pictures/videos and organizes them into a virtual "bulletin board" type thing. It's a really cool site that you can waste tons of time on. A lot of people use it for wedding ideas/planning and there are a ton of beautiful dresses on it. I use wedding dresses as idea for the basis for my ballroom gowns because they tend to have a more classic look than a lot of the ballroom gowns you can find out there. Also, searching for good pictures of ballroom gowns where you can see details is more difficult than you would think.


So I fell in love with a few dresses:
I love the stoning on the skirt, I'm wondering if I could add some of that to my dress.
I love how the skirt starts right at the natural waist. Very classic and flattering.

So pretty!

And I've had some more thoughts on things I'm going to change. So new sketches to come soon.

Wednesday, October 12, 2011

Ballroom Costume- Part 2

I made a mock up of the bodysuit in the stretch white fabric, but I'm not going to post any pictures of it because a. I didn't take any and b. the fabric doesn't make it look very good. The white stretch fabric was a little bit lighter weight than the lycra so it showed any little imperfections more obviously. It was a very useful exercise and helped me realize some things I needed to change before cutting it out of the lycra. So I cut apart the white leotard and traced it to make some patterns! Yay!

Front
Side/back


After making some observations on the original pattern, I made adjustments and redrew it. On the left is the cut apart white leotard piece, on the right is the redrawn pattern.

In lycra!
After realizing that I had forgotten to include seam allowance (eep!) I cut out the pieces in the lycra and pinned and basted the majority of it together. And now it's living on a dress form in my family room (thanks Joe!).


It's inside out because it still needs a little bit of adjusting in the front for perfect fit. I also left the crotch open because I haven't entirely decided how I want to work it, I'm planning to do snaps but haven't decided how long I want to make the legs go down, I'm thinking a boyshort instead of the typical leotard cut because I think they are more comfortable. Also because by the time I got to this point it was 12:30 am and I had to leave for class at 7 am the next morning. It's still in the adjusting stages, my motto is you can always cut more off but you definitely can't cut less.

Wednesday, October 5, 2011

Ballroom dress- the work begins

So up until this point everything was pretty much the fun, happy, glowing stage of a new project where you're planning everything and super excited and it's all you can think about. Today, the work started. I sat down tonight with a mission: to get a leotard pattern on paper. I decided that I wanted to do a leotard with a little bit of a boyshort to it, it covers my bum better and is less likely to cut into my thighs/hips and ride up. I couldn't find any patterns that I liked (that weren't $40, and let's face it, I'm cheap.) So I started to draft a pattern. I've never really made a sewing pattern before. Whenever I knit I always made my own patterns and I read a lot of books on pattern/dressmaking and researched what leotard patterns typically look like. The good thing is, it's supposed to be stretchy and tight, so it should be a little forgiving... right? Let's hope so.

So I spent about an hour and a half measuring myself, measuring paper, sketching on paper, measuring sketches, measuring self again, making adjustments etc etc etc. So I came up with this:


Yay! Paper pieces! And the piece in the middle is intentional, I will explain
The piece on the left is the back/side (there will be two of these sewn together in the back and they will wrap around my sides.) The piece on the right is the center/front (fold on the fabric goes on the dotted line to make one piece twice as wide.) And the liiiittle piece in the center is the crotch. This is by no means a finished pattern, it's a draft that should work in theory, it needs to be tested in practice now.

So this weekend I am going away to IL for my uncle's wedding and I won't be able to actually do any sewing tonight (it's 1 am and I'm so tired just from making this stupid pattern) so I'll get to that next week, hopefully Tuesday. The plan is to make a mock up in some stretch knit white fabric that I have lying around (I'm really not even sure what it's made of, maybe a cotton/polyester blend) so that I can get an idea of if my pattern is working at all before cutting into the good stuff.

Speaking of which, I ordered all my fabric and after a whole little mix up, it came! It is super exciting, here is a sneak peek:

It's like the greenest green ever!

Sunday, August 28, 2011

Update on Ballroom Costume

The search for fabric for the ballroom dress is an ongoing process. I'm thinking to use the Pistachio Chrisanne fabric because it's made specifically for dance costumes and has good drape and flow. I've also been working on making up my own pattern based on another dress pattern. I'm editing in photoshop and then my plan is to project the image onto paper on a wall, adjust it to the proper size, and trace it that way. Patterns for ballroom dresses are ridiculously expensive, I don't feel like paying $45 for one. So here's a little look at what the pattern should look like, though I'm still doing some editing so we'll see how it turns out.
Bodice
Leotard

Skirt

Saturday, August 27, 2011

Renaissance Fair Costume

So the bloomers I was working on (there, I've gone and given away the secret project. Oh well.) are being a pain. There isn't quite enough continuous fabric on the spotted shirt to make the pattern fit so I'm going to have to get creative. I was a little frustrated though so I decided to set it aside for some time.

In the meantime, I finished my Renaissance Faire costume! By which I mostly mean I figured out what skirts and shirt I'm going to wear with it. So check it out!

Fun fun fun!

Tuesday, August 16, 2011

New Project!

I'm about to start a new recycling project using some old clothes from a thrift store! I'll have another post with more project details soon, but until then, here's a picture hint of what I'll be using!


Finished Corset

I haven't been doing a great job keeping up as I go, but the corset is finished!

Here are the lining pieces after chalking and everything:

I had to cut the pieces down a lot from the original size and after some repeated taking in, I got it down. I then had to sew the lining pieces to the jacquard, insert the busk in the front, insert boning, and put in eyelets. After everything here's what it looks like complete with rennaisance chemise!


I will add some more detailed pictures later.

Tuesday, July 26, 2011

Corset Project

Since I don't have my dress form yet and the Maryland Renn Faire is coming up soon, I'm going to be working on a corset! I'll be doing it in a lovely black and silver brocade, but first I have to work up a mock up in some scrap fabric. Here are the cut out pattern pieces:


Now to pin and baste them together for fitting!

I worked up the draft corset and it was way too big! With 5 plus inches of excess I had to take in a lot of seams.

Here's how it looked after all that:


I'll have to chop it down to make it into a new pattern for cutting the final from it. That will have to be another day though because it's 1:40 AM.

Goodnight!

Monday, July 25, 2011

Ballroom Costume- The Beginning

My original purpose in creating this blog was to provide a forum on which to talk about the process as I attempt to make a ballroom dance costume from scratch. If you've never seen Dancing with the Stars or any other ballroom events, you probably have no idea what it is I am getting myself into. Here are some pictures of ballroom dresses to demonstrate:

Stock morenaStock ex redStock s.mintJapan stock

These are just some typical examples, they can vary widely in color, style, and materials. I've been very excited about making this dress for quite a while as some of my dancer friends know as they have been hearing about it for some time. After many weeks of time spent searching online for dresses for inspiration, patterns, and any other helpful information I could glean, I have finally settled on a design.

After coming across this:
 
design, I knew it was what I wanted.

I want to say now that I am not an experienced seamstress. I've sewn a number of small things, pillows, stuffed animals, some clothes, but nothing on this scale. Everything I have made either came with a clear cut pattern or was simple enough not to need one. Not so for this dress. I will be making the pattern from scratch,  doing my best to interpret the dress. I don't intend to make this exact dress, I don't think it would turn out exactly like that anyway, but I used it for inspiration. My dress will (hopefully, and a big emphasis on that) be something like this:
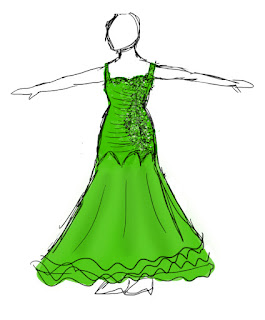
those are rhinestones rather than sequins like in the gold dress
I haven't decided what to do about floats yet, but those are a ways off.

The first step will be to make a mock up of the base pattern in some cheap muslin so that I can adjust it for fit and shape before using the good stuff (well, before I buy the good stuff even, I need to know how much I will need.) Unfortunately, to do that I need a dress form which I don't have at the moment. I'm going to be making my own using plaster just as soon as the plaster cloth arrives in mail, hopefully it will be soon!

A Little About Me

Hello y'all.

I thought I'd share a little about me to start out. I am going to be a junior at the University of Maryland College Park in Fall 2011. There a majority of my time is spent between microbiology classes, knitting/watching tv (always at the same time), and ballroom dancing. I am one of the two team captains of the ballroom dance team there. I am an art person and enjoy knitting, painting, drawing, pottery, and sewing. I intend to use this blog to talk about all of those things and share my experiences, frustrations, and occasionally, triumphs in those areas. Along with anything else I just feel like talking about at the moment. So that's all for now.